

When it comes to how to fix brake pads, one thing that you must know is how to correctly adjust them. The first step is to find your brake pedals. To do this, pull out the front brake cable first, allowing the cable to flow under your seat. Next, lower the front wheel to a point where it can already be gripped by your fingers. You should be able to feel a change in the rim’s stiffness as you continue moving it up and down.
If you would like to know how to fix them but you are having trouble putting the pedals in the right place, you need to take your attention to the calipers. The calipers are located on the inside of the brake calipers, next to the caliper wheels. They should be easily accessible while you are sitting on the seat. If they are not easily reachable, look to the side of the road, then across your path. Calipers may need to be adjusted depending on the type and brand of brakes that you have.
After checking the fit of your calipers, you can proceed to tightening the bolts. Start by loosening the last bolt, then making sure that it is seated tightly. You can tighten the remaining bolts one at a time while you are taking your seat off. You should start from the bottom and work your way to the top.
Lastly, check the handlebar and backside of your bike. If there are any fractures, cracks or breaks on these parts, it will make it harder for you to shift your bike brakes or to lock the backside of your bike. To solve this problem, it is recommended that you replace the damaged part with a new one so that you do not have to do much work. However, if the damage is minor, you can fix the problem by replacing just the handle bar and backside and leave the rest of the parts in their original position.
If you have trouble tightening the bolt or the lock nut, you may have to remove the wheel and check for signs of wear. If you find out that your tyres are too thin, you may need to change them. If you find that the pressure is too high on the handlebars, you may have to adjust bike brakes or locknut. However, if you follow these simple guides, you will be able to perform your own adjustments on your bike.
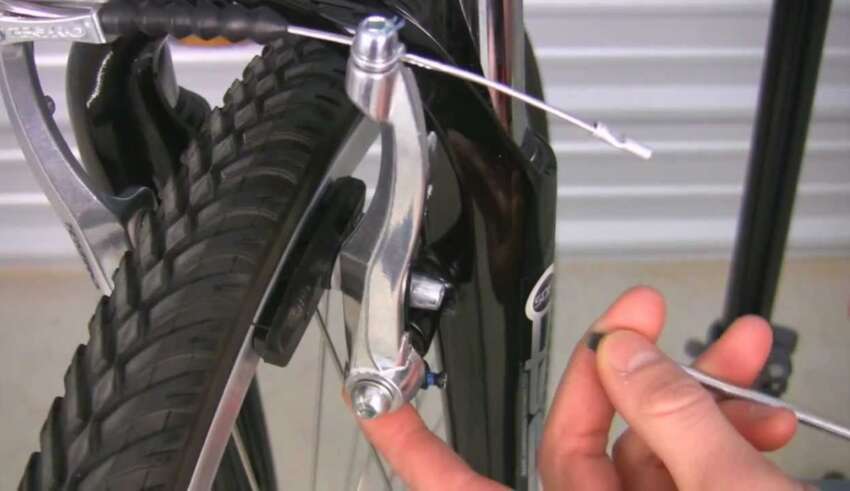
How to tighten bike brakes?

It’s important to know how to tighten bike brakes so that you can get your bike working as good as new again. Two important parts of your brake need checking and tightening; these are the rotors and the brake pads. worn out rotors and loose brake pads can be quite a safety hazard. So, before you take out your bike for a spin, let’s have a quick check over those brakes. Here’s how to tighten bike brakes.
- The first step is to remove the wheel from the frame. Locate the a-arm bolt on the back of the tire and carefully remove it. Next, turn the wheel 90 degrees to the left (toward the floor) and pull the tire off of the rim. This is the bolt you’ll be loosening, which is also the bolt that controls the rolling resistance on your bike.
- The second step is to remove the entire bolt and adjustment dial. The adjustment dial is mounted to a spring clip on the bottom of the tire and a crank adjustment bolt. Remove both the crank and the adjustment dial, turning them counterclockwise to loosen the bolt, and then removing them entirely to access the rotor.
- The third step is to loosen the three screws that secure the brake pads to the rotor. Start by loosening the screw on the far side of the plate. Then move clockwise and do the same on the inwards direction. Finally, loosen the last screw. You can replace the rotors and brake pads by hand or with a wrench.
- The fourth step is to remove the hand lever assembly. Loosen the front wheel nuts and then remove the front wheel from the frame. Locate the front brake lever, which is mounted to the stem with a threaded cap. Pull off the cap and remove the front brake lever. It’s best to do this step backwards because if you don’t, the lever will become jammed between the pedal and the firewall and you will have difficulty stopping the bike.
- The Fifth step is to attach the tire brake pads to the rim using the locking pliers. Use the flat-tipped tip on the pliers to hold the tube against the rim while you pull the tube out. Be very careful when you do this step because it involves pulling the tube out of the rim.
